In this article, we will take a detailed look at the process of connecting and configuring two excellent router models from TP-LINK. These are TL-WR940N and TL-WR941ND. There is no sense to write a separate article for each model, because TL-WR941ND and TL-WR940N are almost identical in appearance and connectors. Also, they have the same control panels. The only difference is that the TL-WR940N router doesn’t have removable antennas, well, and most likely there are minimal pro-gram differences. It is not very important for us in the process of setting up.
There is also an updated model of the router, in a black case. No matter what model you have, you will be able to configure it using these instructions. We will try to describe everything as detailed and clear as possible. We will configure it through the control panel. Therefore, you can leave the disk that you most likely found in the kit. We won’t need it. It has only a utility for configuration and a manual. You can try to configure the router using the utilities, but I would advise you to do it through the WEB-interface.
Important tips before setting up:
connect the router to your computer or laptop using the network cable provided. Only for configuration. It is better to configure the router via cable. After configuration, you can disconnect the network cable.
If you can’t connect via LAN, you can configure it via Wi-Fi. Just connect to an unsecured network, which should appear immediately after turning on the router. Do not flash the router via Wi-Fi! Only by cable.
It’s possible that the router has already been tried to be set up. Either by you or at the store. Those settings, which may already be there, can interfere with us. I advise you to do a reset on your TL-WR940N or TL-WR941ND before you start configuring it.
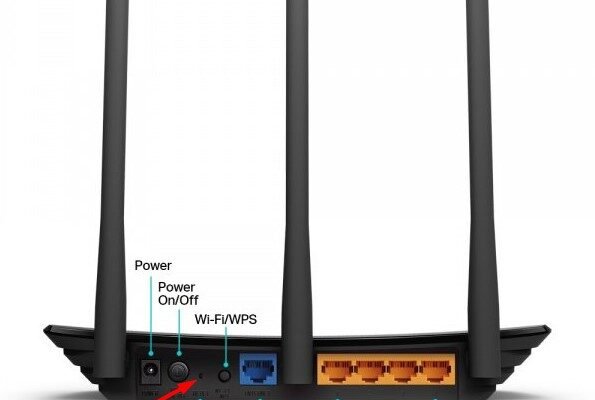
Plug the router into a power outlet. Make sure that the LEDs on the device light up. If not, turn on the power using the special button on the back panel.
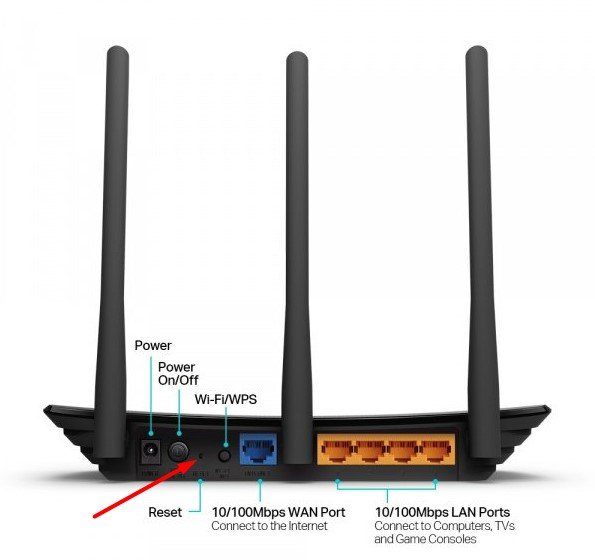
Press and hold the RESET button on the back of the router for about 10 seconds.
If the button is recessed into the case, press it with something sharp. For example, a paper clip. “Just don’t use needles.”
All indicators (lights) on the front panel should blink. This indicates that a reset has occurred.
After that, you can proceed with the configuration.
How do I configure TL-WR940N/TL-WR941ND?
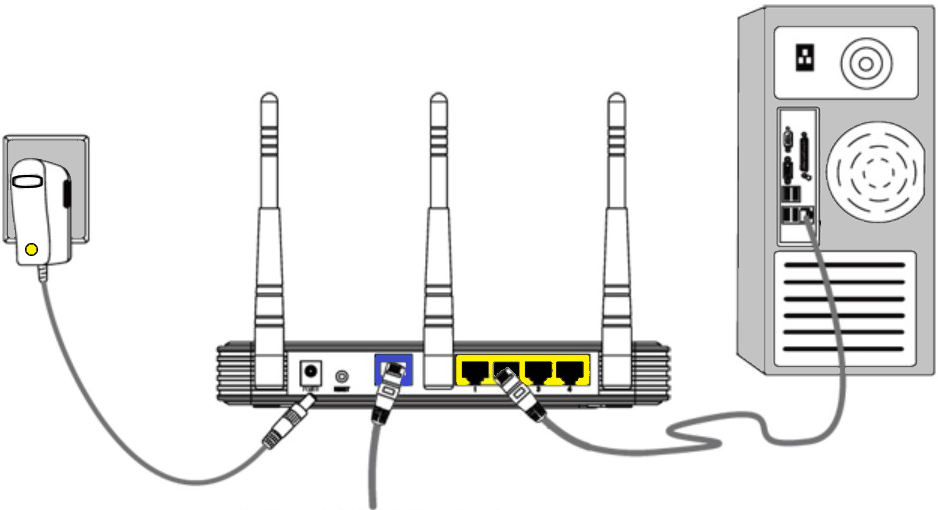
irst, we need to connect everything.
Connect the antennas (if they are removable).
Connect the power cable to the router and plug it into a socket.
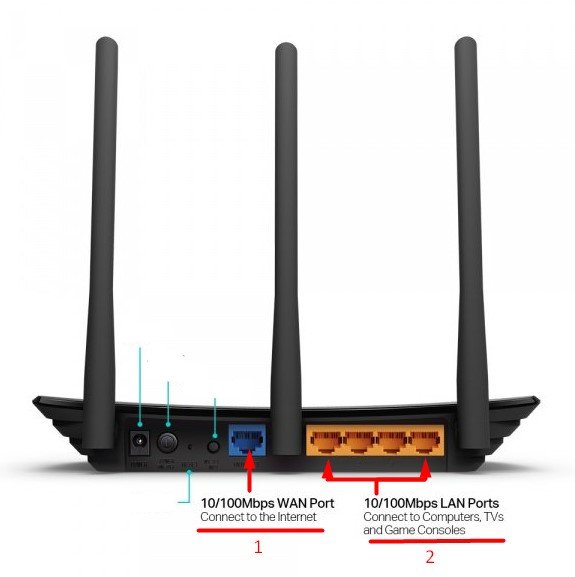
Plug the network cable that came with the router into one of the yellow connectors. Plug the other end of the cable into the network connector on your computer. If you’ll be setting up over Wi-Fi, connect your laptop to an open network, which by default is named something like “TP-LINK_37DE50”. You can turn off the power on the router, if the network disappears, it’s yours.
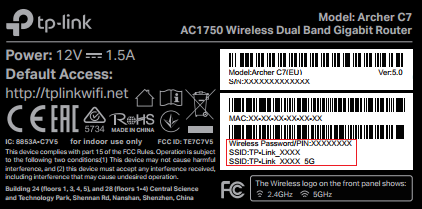
If the wireless network is locked with a password immediately after purchase (in the upgraded model), the standard Wi-Fi password itself is listed on the bottom of the router on the sticker.
tp-link tl-wr940n default password Example: 21664045
Plug the cable from your Internet service provider (or, for example, from an ADSL modem) into the blue connector (WAN).
Setup TP-LINK TL-WR940N (TL-WR941ND)
Open any browser on the computer (to which you connected our TP-LINK TL-WR940N or 941ND). Opera, Chrome, Internet Explorer – it doesn’t matter.
In the address bar of your browser, type http://192.168.1.1 and go to it.
In the new version (which has a black body color), use the address tplinkwifi.net, or 192.168.0.1 to access the settings.
You should be prompted for a login and password. The defaults are admin and admin (you can see this information on the sticker on the bottom of the router).
Enter them, and log in to the control panel. Or see the detailed
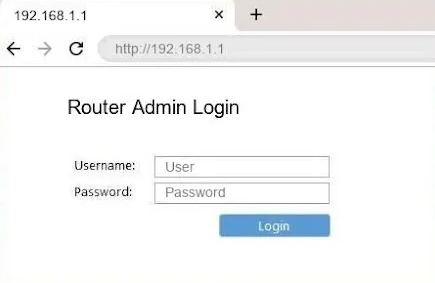
The TP-LINK router control panel should open.
We advise you to check the firmware on which the router is running before setting up. And, if there is a new one, flash the router. If you do not wish to update the software, continue with the instructions.
TL-WR940N WAN manual
This is the most important stage of configuration. We need to configure the router so that it can connect to your ISP and distribute Internet to your devices. If we specify wrong settings on the WAN tab, the Internet will not work through the router.
Your devices will just connect to the Wi-Fi network from TL-WR940N, or TL-WR941ND, but the Internet will not work. Therefore, you need to do everything very carefully.
Most importantly, you need to find out the connection technology your internet service provider uses. Most likely these are: Dynamic IP, Static IP, PPPoE, L2TP, PPTP, etc. Also, you need to find out if your ISP binds to the Internet by MAC address.
You can find out all this information from your ISP’s support, on their website, or in the contract you should have been given when you connected.
Let’s clone the MAC address from the computer to which the Internet has been bound. If you know for sure that your ISP does not do MAC binding, you can skip this point. The instructions are under the spoiler:
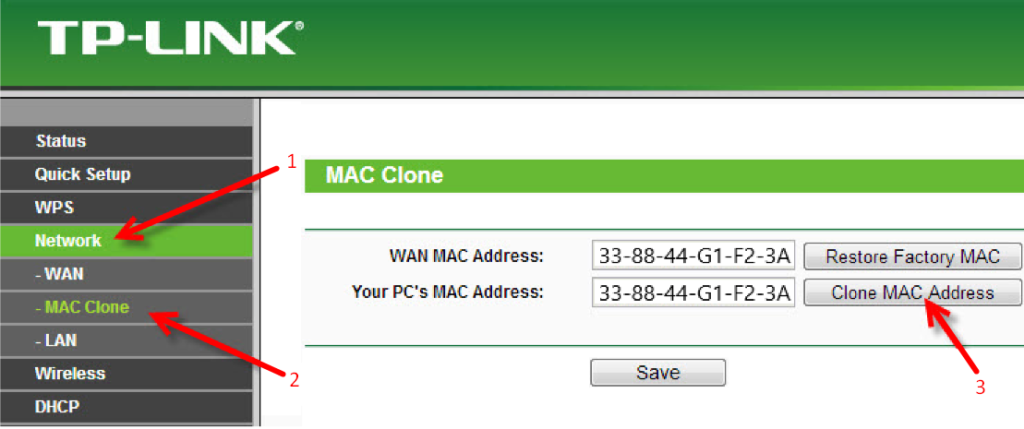
Clone MAC address on TL-WR940N/TL-WR941ND
On the Network (1) – MAC Clone tab(2), click on the Clone MAC Address button (3). The router must be connected to the computer whose MAC address is specified by your ISP.
Click the Network – WAN tab, and next to WAN Connection Type, select the connection technology your ISP uses.
Dynamic IP
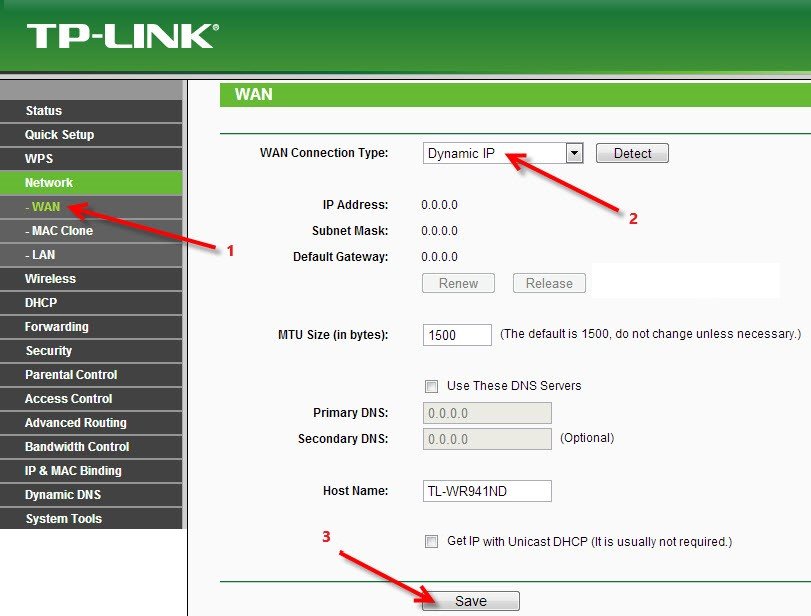
If your ISP uses Dynamic IP connection technology (most likely it is, it’s a very popular technology), then select “Dynamic IP” and the Internet should work immediately. But it is better to save everything by clicking on the Save button and reboot the router.
Settings for other connection technologies:
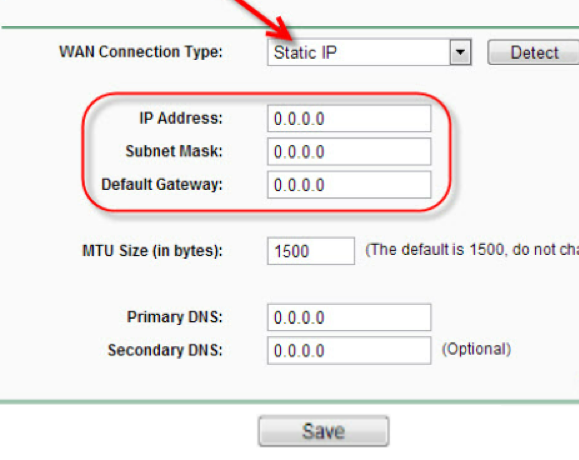
Static IP
Select Static IP, specify the IP given to us by the provider and click Save to save the settings.
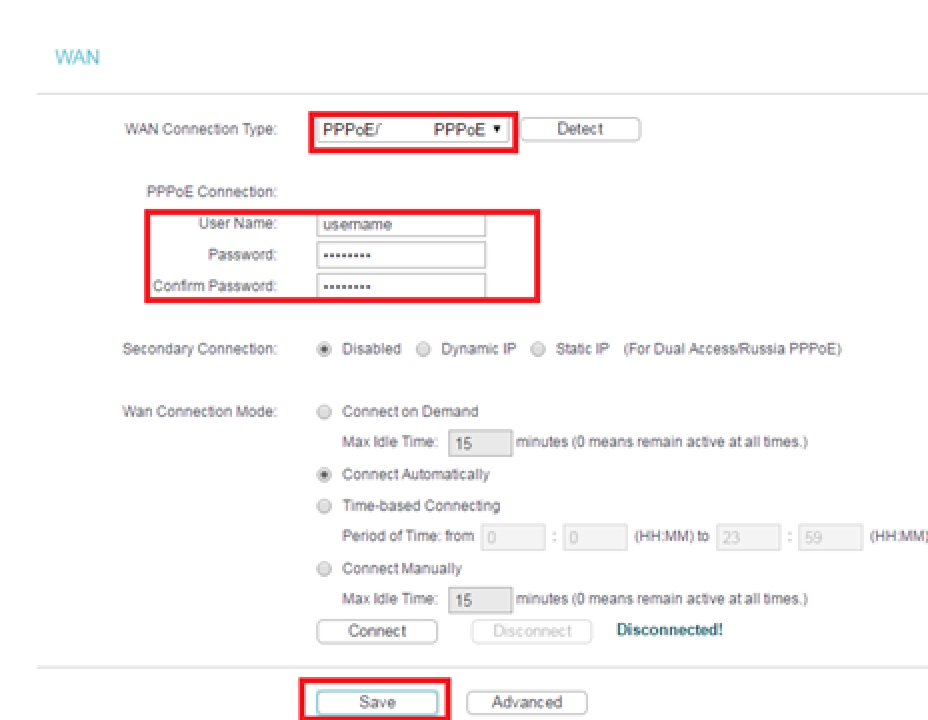
PPPoE
Select PPPoE, and below specify the necessary parameters that your ISP has given you: login, password, and possibly also IP address.
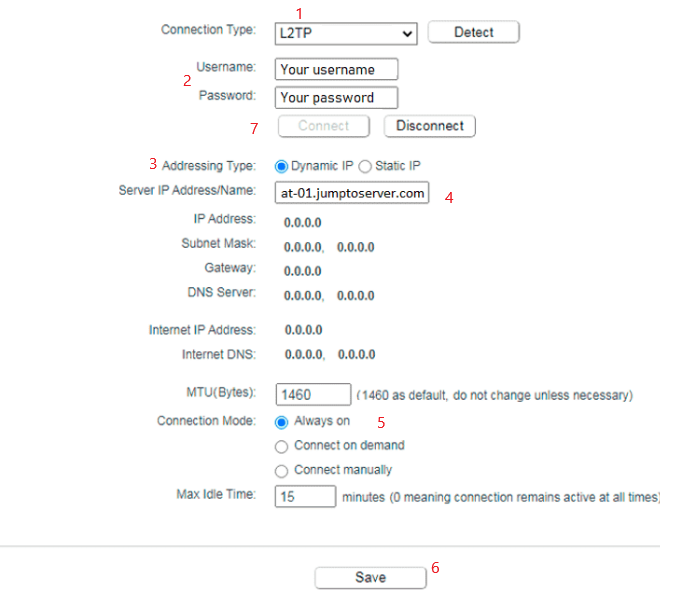
L2TP, or PPTP
Choose one of the technologies and set the required parameters in the order shown on the screenshot. To save the settings, don’t forget to click the Save button.
If you’ve set up the correct connection type, the internet should start working right away. Save your settings and restart the router. You can reboot it from the System Tools – Reboot section in the control panel by pressing the Reboot button. Once the router restarts, your internet connection on the computer should be up and running.
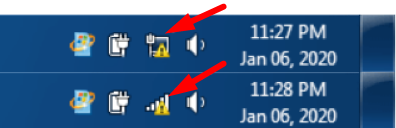
The yellow triangle near the network icon should disappear, and the connection status should say “Internet Access.” If the internet still doesn’t work through the TL-WR941ND, check the settings in the WAN tab — there’s likely an error there. Make sure you’ve correctly cloned the MAC address if required.
Also, if you had previously set up a high-speed connection on your computer, you can go ahead and remove it.
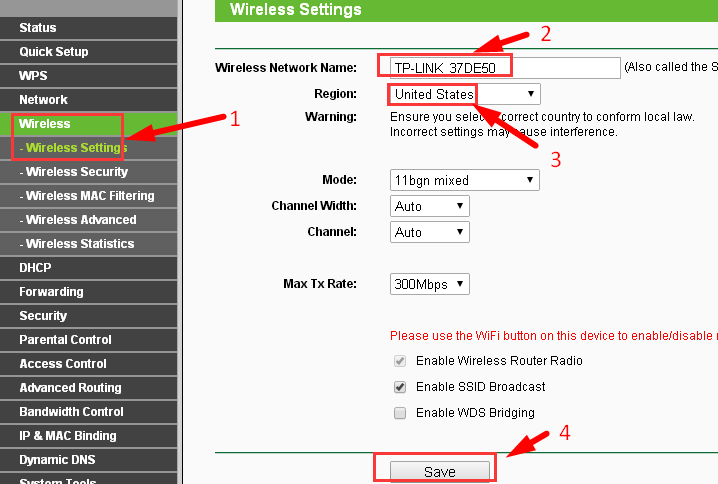
TL-WR941ND Wireless – Wireless Settings
Set a name for your Wi-Fi network and select your region from the list.
Wi-Fi setup on TL-WR941ND: Next, go to the Wireless tab >> Wireless Security. This is where you’ll set a password to ensure no one can connect to your network without permission.
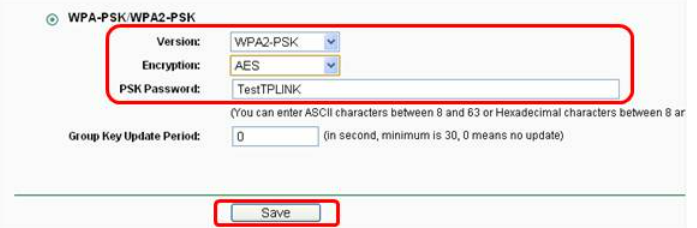
Select WPA/WPA2 – (Recommended), and in the Wireless Password field, enter your password. I recommend using exactly 8 characters, combining English letters and numbers.
Click the Save button at the bottom to save the settings.
You can change the Wi-Fi password at any time, but I recommend setting it up during the initial router configuration.
Setting the Date and Securing the Admin Panel
Go to the System Tools tab and select Time Settings. Set the correct time zone, date, and time, and don’t forget to save the settings.
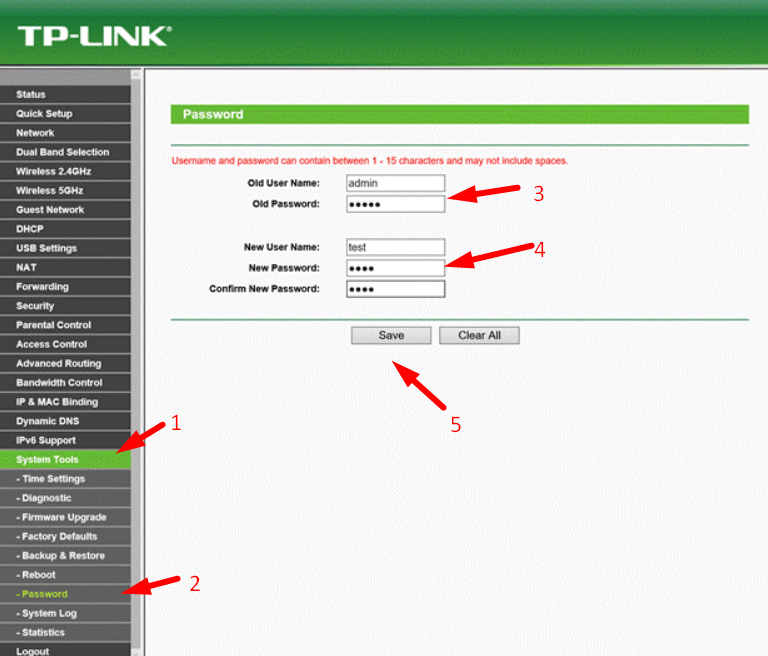
Next, go to the System Tools – Password tab.
Here, you’ll change the default login credentials for accessing the router settings.
In the Old User Name and Old Password fields, enter the default values: admin and admin. In the fields below, enter your new username (you can keep admin) and create a new password. Be sure to write the password down for safekeeping.
That’s it! All that’s left is to reboot your TP-LINK TL-WR940N or TL-WR941ND (if you’ve configured it), and then you can start connecting your devices to the internet: smartphones, laptops, computers, tablets, TVs, and more.