Setting the time on a Casio G-Shock can be confusing, especially if it’s your first one. This guide gives you a clear, step-by-step answer that works for the most popular GA models—and explains where they differ.
Before we start, know that not all G-Shocks set up the same way. Differences include:
- Button layouts (some limited or special editions place buttons differently).
- Setting logic based on the movement and modes (analog/digital chronograph models without auto-sync behave differently).
- Model-specific features that add unique options or extra steps.
With that in mind, we’ll walk through the universal process first, then note the key variations so you can set your G-Shock correctly the first time.
Pictorial instructions

How to set the time on G-Shock in {year}
In general, for most models, the principle of time setup remains the same. We will take a closer look at the most popular model Casio GA-100 and use it as an example to perform a complete setup of all functions and time.
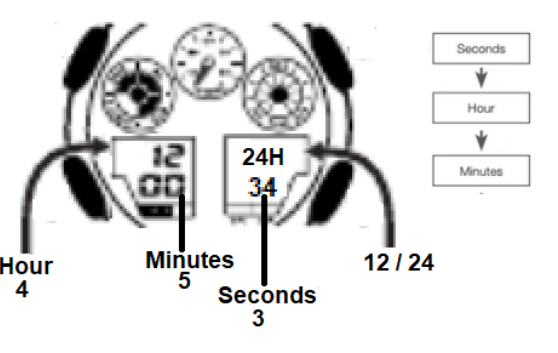
Button Map (typical GA)
1 — ADJUST (hold to enter settings / press to save & exit)
2 — MODE (cycle through setting fields/modes)
3 — REVERSE (–)
4 — FORWARD (+)
The arrangement might be different, but it is not critical.
To start the setup, hold down button 1 (ADJUST) until you hear a beep. You can also press button 1 (ADJUST) once to exit at any stage of the setup and save your changes.\
By pressing button 2 (MODE), you can switch between the setup modes.
- Long-press ADJUST until the beep → choose Home City/Time Zone with REVERSE/FORWARD.
- Tap MODE to step through DST → 12/24-hour → seconds → hour → minutes → year → month → day → backlight (LT1 1.5s / LT2 3s).
- Press ADJUST to save anytime.
- If analog hands don’t match the digital time, calibrate the hands (Hand Setting / Home Position).

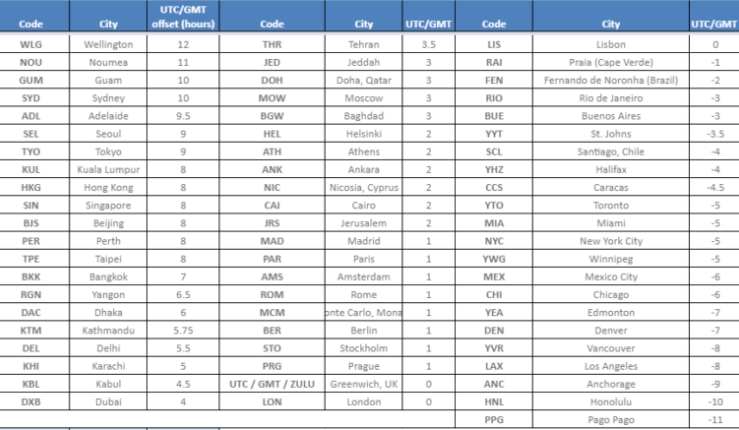
1.) Start. After holding down button 1 (ADJUST), you will hear a beep, and one of the time zones will start flashing. Then, toggle between the time zones by pressing button 3 “Reverse” and button 4 “Forward”
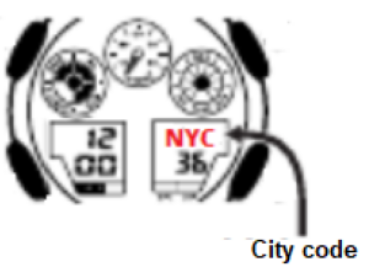
2.) DST (Daylight Saving Time) Press 2 (MODE). You switch to the next mode of DST setting for summertime setup. Here, you can enable or disable it (ON/OFF) by pressing button 4.
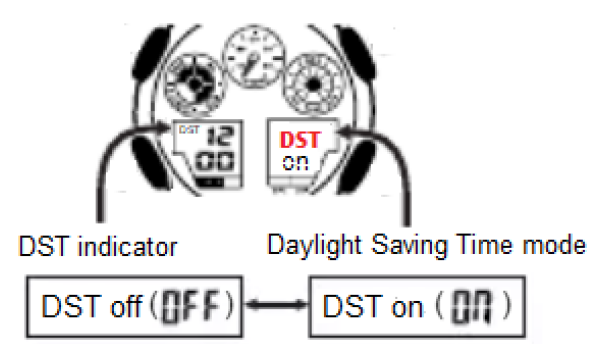
3.) 12/24-Hour Format -Then press 2 (MODE) again and switch to the 12/24 hour digital time display mode. By pressing button 4 (FORWARD), you can change the display.
4.) Seconds Reset. Next, press 2 (MODE) and adjust the seconds by pressing 4 (FORWARD). We reset the value of seconds to 0.
5.) Hour / Minutes. Tap MODE to Hour → set with REVERSE/FORWARD.
Tap MODE to Minutes → set with REVERSE/FORWARD.
6.) Year → Month → Day. Switch further by pressing button 2 (MODE) for the year setup, followed by the month and the day setup.

7.) Backlight Duration (LT) Finally, by pressing button 2 (MODE), we proceed to the setting of the operating mode of the LED backlight (LT). Then, by pressing button 4 (FORWARD), we set LT1 to 1.5 seconds or LT2 to 3 seconds.
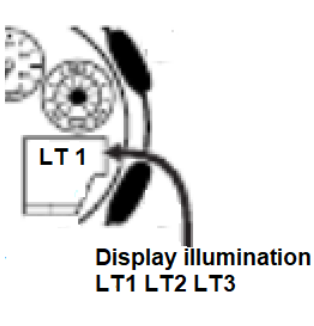
Lifehacks: By choosing LT 1, you can significantly save battery life for several years.
To activate the AUTO light switch when you turn your hand, you need to hold down button 3 (REVERSE) for a few seconds without accessing the setup mode of the watch.
8.) Save.By pressing 1 (ADJUST), you can save the changes at any stage of the watch setup.
The instructions are suitable for these models: (GA-100, GA-110, GA-120, GA-200, GA-400, GA-2100, GA-2000, GA-140, GA-800, GA-700)