- How to Set Time on Casio Pro Trek (by Series)
- PRW-3000 — Time Adjustment
- PRG-240 (PRG-240T/240B) – Time Adjustment (Digital)
- PRW-7000 – Time Adjustment + Hand Correction (Ana-Dig)
- PRW-6100 – Time Adjustment + Hand Correction (Ana-Dig)
- PRG-270 / PRG-270D — Time Adjustment (Digital)
- Official Casio Pro Trek Manuals – English
- Need module-specific wording?
- Author
How to Set Time on Casio Pro Trek (by Series)
Most Casio Pro Trek models share a similar logic: you start in Timekeeping, hold E (Adjust) to enter settings, pick the Home City, then walk through DST → 12/24h → seconds → hours → minutes → year → month → day with D (Mode), editing values with A/C. Below are precise steps for the series you listed.
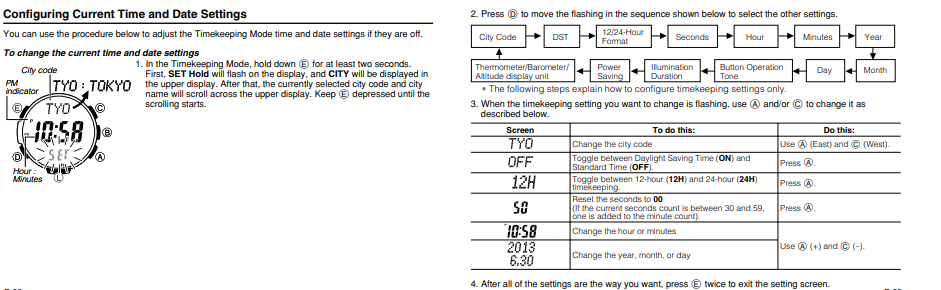
PRW-3000 — Time Adjustment
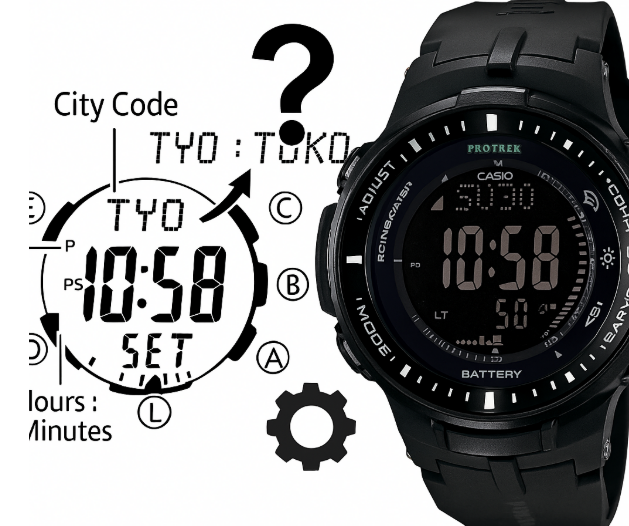
Configuring Current Time and Date Settings Manually
You can set the current time and calendar by hand when the watch can’t receive a time-calibration signal.
To change the current time and date settings manually
- Enter setting mode
• In the Timekeeping Mode, hold down E for at least two seconds.
• “SET Hold” flashes, then CITY appears in the upper display.
• The currently selected city code and city name scroll across the upper display.
• Keep E pressed until the scrolling starts, then release. - Choose what you want to adjust
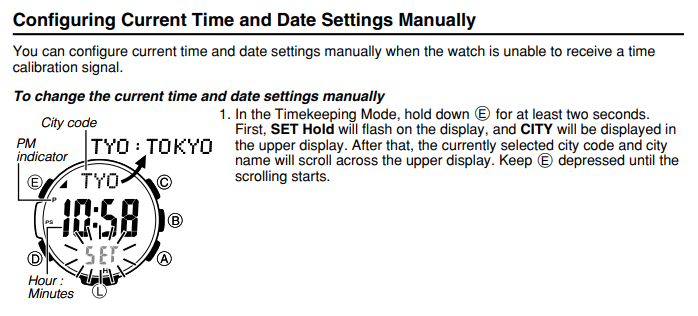
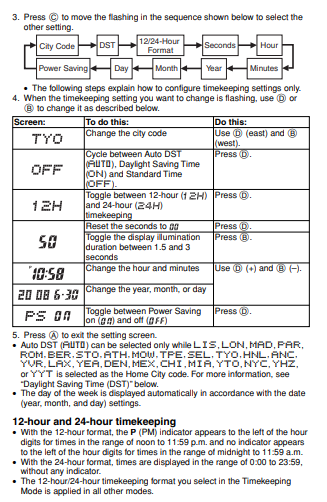
Press D to move the flashing item in this sequence:
City Code → DST → 12/24-Hour Format → Seconds → Hour → Minutes → Year ↓ Month → Day → Button Operation Tone → Illumination Duration → Power Saving → Thermometer/Barometer/Altitude display unit (Only the timekeeping items are explained below.)
- Change the flashing item
Use A and/or C as shown:
Screen: TYO
• Action: Change the city code
• How: A = East, C = West
Screen: AUTO
• Action: Cycle Daylight Saving Time
• How: Press A to toggle AUTO (Auto DST) → ON (DST) → OFF (Standard Time)
Screen: 12H
• Action: Select time format
• How: Press A to toggle 12H ↔ 24H
Screen: 50 (seconds flashing)
• Action: Reset seconds to 00
• How: Press A
– If the current seconds are 30–59, minutes increase by +1.
– If 00–29, minutes do not change.
Screen: 10:58 (hour/minute flashing)
• Action: Set hour or minutes
• How: A = increase, C = decrease
Screen: 2013 / 6-30 (year/month/day flashing)
• Action: Set year, month, or day
• How: A = increase, C = decrease
- Save and exit
When all settings are correct, press E twice to leave the setting screen.
PRG-240 (PRG-240T/240B) – Time Adjustment (Digital)
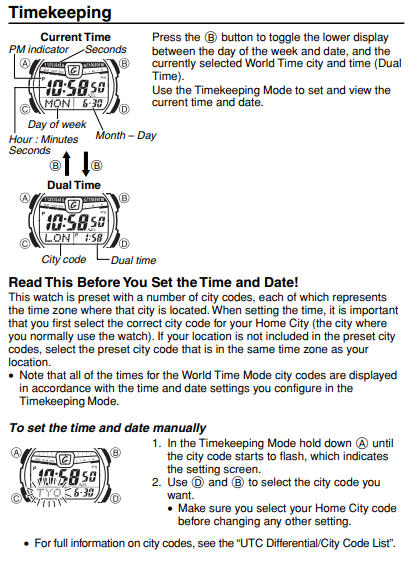
Timekeeping (what you see)
- Current Time screen shows: hour:minutes:seconds, day of week, month-day.
Use B to toggle the small lower display between the day/date and the current World Time city & time (Dual Time). - Dual Time screen shows: selected City code and its time.
Read this before you set the time and date
- The watch is preloaded with many city codes (time zones).
Always select your Home City first (the city/time zone where you usually wear the watch).
If your city isn’t listed, pick a city in the same time zone. - World Time city times are based on the Timekeeping Mode settings (your time/date).
To set the time and date manually
- Enter settings
In Timekeeping Mode, hold A until the city code starts flashing (this is the setting screen). - Choose the city
Use D and B to select your Home City code.
Make sure Home City is correct before changing any other item. - Move through items
Press C to step the flashing cursor through this sequence:
City Code → DST → 12/24-Hour Format → Seconds → Hour → Minutes → Year → Month → Day → Power Saving
(Some models also include Illumination Duration in this sequence.) - Change the flashing item
Use A (and/or B where noted) to change values:- City Code (e.g., TYO) – change city with A (east) and B (west).
- DST (OFF/AUTO/ON) – press A to cycle: AUTO → ON → OFF.
- 12H/24H – press A to toggle 12-hour ↔ 24-hour time.
- Seconds (e.g., 50) – press A to reset to 00
• If seconds were 30-59, minutes increase by +1.
• If 00-29, minutes do not change. - Hour / Minutes (e.g., 10:58) – A = up (+), B = down (-).
- Year / Month / Day (e.g., 2018 / 6-30) – A = up (+), B = down (-).
- Illumination Duration – press A to toggle between 1.5s and 3s. (Only if your model shows this item.)
- Power Saving (PS on/off) – press A to toggle on/off.
- Save & exit
Press A to exit the setting screen.
Notes on 12-/24-hour time
- 12-hour format: the PM indicator appears for 12:00–11:59 p.m.; no indicator for 12:00–11:59 a.m.
- 24-hour format: time runs 0:00–23:59 with no AM/PM indicator.
- The 12H/24H format you choose in Timekeeping applies to all modes.
PRW-7000 – Time Adjustment + Hand Correction (Ana-Dig)
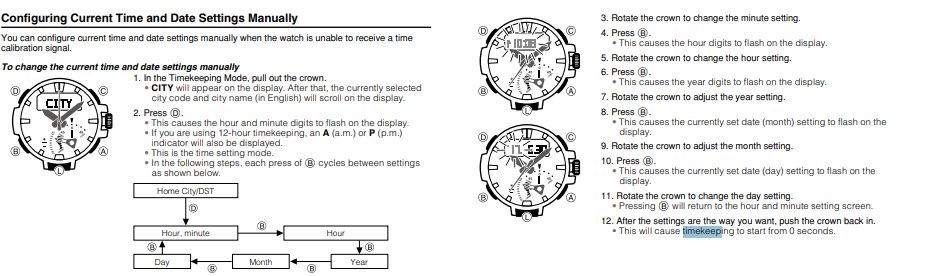
Configuring Current Time and Date Settings Manually
You can set the time and date manually when the watch cannot receive a time calibration signal.
Enter setting mode
- In the Timekeeping Mode, pull out the crown.
- “CITY” appears on the display.
- If 12-hour time is active, an A (a.m.) or P (p.m.) indicator is also shown.
- You are now in the time setting mode.
- Press B to move between settings. Each press of B advances in this order:
Home City/DST → Hour, minute → Hour → Minute → Year → Month → Day- You can cycle through repeatedly with B.
Change values
- Rotate the crown to change the minute setting when “minute” is selected.
- Press B to move to the next item.
- The hour digits start flashing.
- Rotate the crown to change the hour setting.
- Press B.
- The year digits start flashing.
- Rotate the crown to adjust the year.
- Press B.
- The currently set month starts flashing on the display.
- Rotate the crown to adjust the month.
- Press B.
- The currently set day starts flashing on the display.
- Rotate the crown to change the day.
- Pressing B again returns to the hour and minute setting screen.
Exit
- When all settings are correct, push the crown back in.
- Timekeeping restarts from 00 seconds.
PRW-6100 – Time Adjustment + Hand Correction (Ana-Dig)
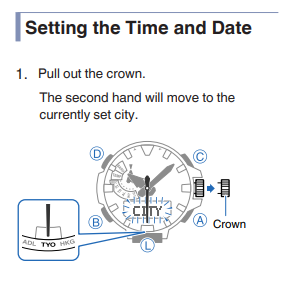
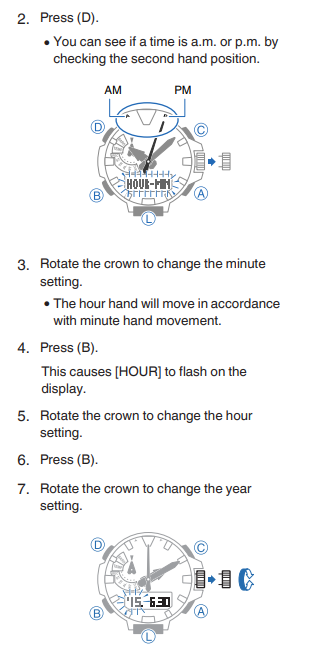
Setting the Time and Date
- Pull out the crown.
- The second hand moves to the currently set city.
- Press D.
- You can check a.m./p.m. by looking at the second hand position.
- Rotate the crown to change the minute setting.
- The hour hand moves along with minute changes.
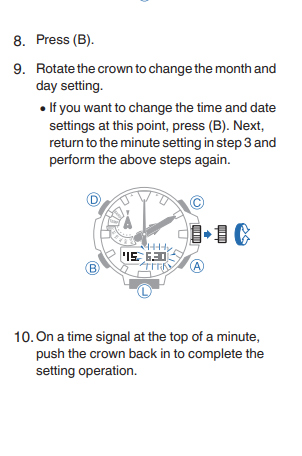
- Press B.
- [HOUR] flashes on the display.
- Rotate the crown to change the hour setting.
- Press B.
- Rotate the crown to change the year setting.
- Press B.
- Rotate the crown to change the month and day settings.
- If you want to change time and date settings again, press B to return to the minute setting (step 3) and repeat.
- At the top of a minute (when the time signal hits 00 seconds), push the crown back in to complete the setting.
PRG-270 / PRG-270D — Time Adjustment (Digital)
To change the current time and date settingss
- In the Timekeeping Mode, hold down E for at least two seconds.
- SET Hold flashes on the display.
- CITY appears in the upper display, then the selected city code and city name scroll. Keep E held until scrolling starts.
- Press D to move the flashing through settings in this sequence:
City Code → DST → 12/24-Hour Format → Seconds → Hour → Minutes → Year → Month → Day → Button Operation Tone → Illumination Duration → Power Saving → Thermometer/Barometer/Altitude display unit- The steps below explain how to configure Timekeeping settings only.
- When the Timekeeping setting you want to change is flashing, use A and/or C to change it as described:
- Screen: TYO
To do this: Change the city code
Do this: Use A (East) and C (West). - Screen: OFF
To do this: Toggle between Auto DST (AUTO), Daylight Saving Time (ON), and Standard Time (OFF)
Do this: Press A. - Screen: 12H
To do this: Toggle between 12-hour (12H) and 24-hour (24H) timekeeping
Do this: Press A. - Screen: 50
To do this: Reset the seconds to 00
Do this: Press A.- If current seconds are between 30 and 59, minutes increase by 1.
- Screen: 10:58
To do this: Change the hour or minutes
Do this: Use A (+) and C (-). - Screen: 2013 / 6.30
To do this: Change the year, month, or day
Do this: Use A (+) and C (-).
- After all settings are as you want, press E twice to exit the setting screen.
Official Casio Pro Trek Manuals – English
For detailed instructions on time setting, sensors, calibration, alarms, and all other features, users can find complete information here in the official manuals below. For additional Pro Trek models, browse Casio’s manual library here.
- PRW-3000 – Module 3414
- PRG-240 – PRG-240T – PRG-240B – Module 3150
- PRW-7000 – Module 5480
- PRW-6100 – Module 5470
- PRG-270 – PRG-270D – Module 3415
Coverage and legal
- All guidance on this page is based on official Casio manuals linked above and is provided for educational purposes.
- We are not affiliated with Casio. Always match the 4-digit module number on your caseback to the correct manual.
- Battery or case work can affect water resistance and warranty. If unsure, contact an authorized service center.
Need module-specific wording?
The four-digit module number on the case-back maps to the exact manual. Use it if you want screen labels that match perfectly; the button flow above is already aligned to each series.